
Page 667 - General Catalogue
P. 667
INTRODUCTION
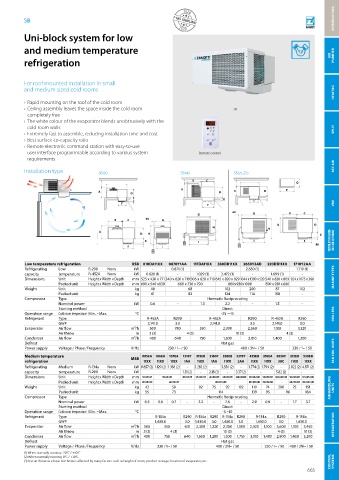
SB
Uni-block system for low
and medium temperature
refrigeration AIR PURIFIER
BSB125T261D
Dimensioni - Dimensions - Dimensions
Abmessungen - Dimensiones - Afmetingen - Διαστάσεις
For roof mounted installation in small
and medium sized cold rooms HEATING
BSB120NO261D MSB140T38E BSB125T261D
› Rapid mounting on the roof of the cold room
Dimensioni - Dimensions - Dimensions
› Ceiling assembly leaves the space inside the cold room Dimensioni - Dimensions - Dimensions Dimensioni - Dimensions - Dimensions
Abmessungen - Dimensiones - Afmetingen - Διαστάσεις
SB
Abmessungen - Dimensiones - Afmetingen - ΔιαστάσειςAbmessungen - Dimensiones - Afmetingen - Διαστάσεις
completely free
› The white colour of the evaporator blends unobtrusively with the
cold room walls SPLIT
› Extremely fast to assemble, reducing installation time and cost
MSB140T38E
› Best surface-to-capacity ratio Schema di montaggio - Mounting scheme - Schema de montage
Dimensioni - Dimensions - Dimensions
› Remote electronic command station with easy-to-use Montageschema - Esquema de montaje - Montageschema - Σχέδιο εγκατάστασης
Abmessungen - Dimensiones - Afmetingen - Διαστάσεις
•
Scarico acqua di condensa Ø 10
• Condensate drain line Ø 10
user interface programmable according to various system Remote control • • • Ecoulement eau de condensation Ø 10
Kondensatablaßrohr Ø 10
Desagüe ague de condensoción Ø 10
requirements • • Condensaftapleiding Ø 10
Γραμμή αποστράγγισης Ø 10
SKY AIR
Installation type Schema di montaggio - Mounting scheme - Schema de montage SB140 SB125-235
Schema di montaggio - Mounting scheme - Schema de montage Schema di montaggio - Mounting scheme - Schema de montage
SB120
Montageschema - Esquema de montaje - Montageschema - Σχέδιο εγκατάστασης
Montageschema - Esquema de montaje - Montageschema - Σχέδιο εγκατάστασηςMontageschema - Esquema de montaje - Montageschema - Σχέδιο εγκατάστασης
• Scarico acqua di condensa Ø 10
• Condensate drain line Ø 10
•
Iniettare silicone su tutto il perimetro del tampone.
• Ecoulement eau de condensation Ø 10 • Scarico acqua di condensa Ø 10
• Kondensatablaßrohr Ø 10 B C Foro / Hole / Trou • Condensate drain line Ø 10
Sul lato superiore eseguire l’operazione prima del posizionamento.
Inject silicone seal round the whole perimeter of the opening in the panel.
• Desagüe ague de condensoción Ø 10 / Loch / Agujero / Q • Ecoulement eau de condensation Ø 10
•
Boorgat
On the upper side, do that before siting the Uniblock.
• Condensaftapleiding Ø 10 Οπή • Kondensatablaßrohr Ø 10
Injecter silicone sur tout le perimetre du tampon.
•
• Γραμμή αποστράγγισης Ø 10 • Desagüe ague de condensoción Ø 10
Sur la partie superieure injecter avant de fixer l’Uniblock.
A A • Scarico acqua di condensa Ø 10 • • Condensaftapleiding Ø 10
•
Condensate drain line Ø 10 P
Γραμμή αποστράγγισης Ø 10
Spritzen Silikon auf den ganzen Stopfenperimeter ein.
• D
BSB120NO261D A D BSB125T261D D BSB125T261D • Auf der Oberseite, führen das aus bevor man den Uniblock einbaut.
Inyectar silicona sobre todo el perimetro del agujero.
Ecoulement eau de condensation Ø 10
•
Kondensatablaßrohr Ø 10
Sobre la parte superiore, se coloca antes de situar el Uniblock.
•
• Desagüe ague de condensoción Ø 10 • Injecteer siliconedichting rond de hele omtrekt van de opening in het paneel. Doe dat ook
aan de bovenkant voordat u het Uniblock monteert.
Dimensioni - Dimensions - Dimensions
Dimensioni - Dimensions - Dimensions Dimensioni - Dimensions - Dimensions E F • • Condensaftapleiding Ø 10 • Εγχύστε στεγανοποίηση σιλικόνης γύρω από όλη την περίμετρο του ανοίγματος στο πάνελ.
Γραμμή αποστράγγισης Ø 10
Στην επάνω πλευρά κάντε το αυτό προτού τοποθετήσετε το Uniblock.
VRV
F
Abmessungen - Dimensiones - Afmetingen - Διαστάσεις Abmessungen - Dimensiones - Afmetingen - Διαστάσεις Abmessungen - Dimensiones - Afmetingen - Διαστάσεις
F
Schema di montaggio - Mounting scheme - Schema de montage • Raccomandazioni in sede di installazione e per il controllo fornite sul manuale di installazione
To be advised at time of order for factory installation and operating instructions
•
• Montageschema - Esquema de montaje - Montageschema - Σχέδιο εγκατάστασης Foro / Hole / Trou • Iniettare silicone su tutto il perimetro del tampone.
•
Recommandations au moments d’installations et pour le contròle fournis sur le manuel d’installation
60
G
C
B
Foro / Hole / Trou Iniettare silicone su tutto il perimetro del tampone. Foro / Hole / Trou • Iniettare silicone su tutto il perimetro del tampone. • Sul lato superiore eseguire l’operazione prima del posizionamento.
/ Loch / Agujero /
Sul lato superiore eseguire l’operazione prima del posizionamento.
Sul lato superiore eseguire l’operazione prima del posizionamento. Inject silicone seal round the whole perimeter of the opening in the panel.
/ Loch / Agujero /
/ Loch / Agujero /
MAS235T02E Boorgat • Inject silicone seal round the whole perimeter of the opening in the panel. Boorgat G • Inject silicone seal round the whole perimeter of the opening in the panel. • Empfehlungen für die Installationsphase und zur Kontrolle, die im Handbuch zur Installation enthalten sind
Boorgat
On the upper side, do that before siting the Uniblock.
Οπή
Por cuanto respecta a recomendaciones de instalaciòn y control ver manual de instalaciòn
•
Οπή
On the upper side, do that before siting the Uniblock. Οπή On the upper side, do that before siting the Uniblock. • Injecter silicone sur tout le perimetre du tampon.
60
•
Te melden bij het bestellen voor installatie- en bedieningsinstructies van fabrikant
G
B C • Injecter silicone sur tout le perimetre du tampon. • Injecter silicone sur tout le perimetre du tampon. • Sur la partie superieure injecter avant de fixer l’Uniblock.
Spritzen Silikon auf den ganzen Stopfenperimeter ein.
Sur la partie superieure injecter avant de fixer l’Uniblock.
Sur la partie superieure injecter avant de fixer l’Uniblock.
Θα υπάρξει ενημέρωση κατά την παραγγελία για εγκατάσταση εργοστασίου και οδηγίες λειτουργίας
•
• Spritzen Silikon auf den ganzen Stopfenperimeter ein. • Spritzen Silikon auf den ganzen Stopfenperimeter ein. Auf der Oberseite, führen das aus bevor man den Uniblock einbaut.
Auf der Oberseite, führen das aus bevor man den Uniblock einbaut. Auf der Oberseite, führen das aus bevor man den Uniblock einbaut. Inyectar silicona sobre todo el perimetro del agujero.
A
•
• Inyectar silicona sobre todo el perimetro del agujero. • Scarico acqua di condensa Ø 10 Sobre la parte superiore, se coloca antes de situar el Uniblock. D
Inyectar silicona sobre todo el perimetro del agujero.
•
Sobre la parte superiore, se coloca antes de situar el Uniblock. H • Condensate drain line Ø 10 Massa e misure imballi - Packing mass and dimensions - Masse et dimensions emballages - Verpackungsmasse und-abmessungen
Sobre la parte superiore, se coloca antes de situar el Uniblock. •
• Injecteer siliconedichting rond de hele omtrekt van de opening in het paneel. Doe dat ook aan de bovenkant • Ecoulement eau de condensation Ø 10 H Injecteer siliconedichting rond de hele omtrekt van de opening in het paneel. Doe dat ook
Masa y medidas del embalaje - Verpakkingsmassa en -afmetingen - Μάζα συσκευασίας και διαστάσεις
•
Injecteer siliconedichting rond de hele omtrekt van de opening in het paneel. Doe
aan de bovenkant voordat u het Uniblock monteert.
VENTILATION & BID-
DLE AIR CURTAINS
dat ook aan de bovenkant voordat u het Uniblock monteert. •
A • voordat u het Uniblock monteert. • Kondensatablaßrohr Ø 10 Εγχύστε στεγανοποίηση σιλικόνης γύρω από όλη την περίμετρο του ανοίγματος στο πάνελ.
Εγχύστε στεγανοποίηση σιλικόνης γύρω από όλη την περίμετρο του ανοίγματος στο πάνελ. Στην επάνω
•
Εγχύστε στεγανοποίηση σιλικόνης γύρω από όλη την περίμετρο του ανοίγματος
D H • • Desagüe ague de condensoción Ø 10 Στην επάνω πλευρά κάντε το αυτό προτού τοποθετήσετε το Uniblock. E MASSA-MASS-MASA-MASSE-MASSE - MASSA - μάζα
πλευρά κάντε το αυτό προτού τοποθετήσετε το Uniblock.
Condensaftapleiding Ø 10
στο πάνελ. Στην επάνω πλευρά κάντε το αυτό προτού τοποθετήσετε το Uniblock.
• Raccomandazioni in sede di installazione e per il controllo fornite sul manuale di installazione • Γραμμή αποστράγγισης Ø 10 14 Kg
• To be advised at time of order for factory installation and operating instructions • • Raccomandazioni in sede di installazione e per il controllo fornite sul manuale di installazione• Raccomandazioni in sede di installazione e per il controllo fornite sul manuale di installazione VOLUME-VOLUME-VOLUME-VOLUMEN-VOLUMEN-VOLUME-όγκος
I
E
F
Recommandations au moments d’installations et pour le contròle fournis sur le manuel d’installation To be advised at time of order for factory installation and operating instructions•
To be advised at time of order for factory installation and operating instructions
• • I
98
Recommandations au moments d’installations et pour le contròle fournis sur le manuel d’installation•
• Empfehlungen für die Installationsphase und zur Kontrolle, die im Handbuch zur Installation enthalten sind Recommandations au moments d’installations et pour le contròle fournis sur le manuel d’installation 0,38 m 3
Empfehlungen für die Installationsphase und zur Kontrolle, die im Handbuch zur Installation enthalten sind•
F
Foro / Hole / Trou I
•
• Por cuanto respecta a recomendaciones de instalaciòn y control ver manual de instalaciòn Iniettare silicone su tutto il perimetro del tampone. Empfehlungen für die Installationsphase und zur Kontrolle, die im Handbuch zur Installation enthalten sind
•
Por cuanto respecta a recomendaciones de instalaciòn y control ver manual de instalaciòn•
•
• Te melden bij het bestellen voor installatie- en bedieningsinstructies van fabrikant Sul lato superiore eseguire l’operazione prima del posizionamento. Por cuanto respecta a recomendaciones de instalaciòn y control ver manual de instalaciòn
/ Loch / Agujero /
•
• Θα υπάρξει ενημέρωση κατά την παραγγελία για εγκατάσταση εργοστασίου και οδηγίες λειτουργίας • Te melden bij het bestellen voor installatie- en bedieningsinstructies van fabrikant• Te melden bij het bestellen voor installatie- en bedieningsinstructies van fabrikant
Inject silicone seal round the whole perimeter of the opening in the panel.
Boorgat
Θα υπάρξει ενημέρωση κατά την παραγγελία για εγκατάσταση εργοστασίου και οδηγίες λειτουργίας•
•
Οπή • On the upper side, do that before siting the Uniblock. Θα υπάρξει ενημέρωση κατά την παραγγελία για εγκατάσταση εργοστασίου και οδηγίες λειτουργίας
Injecter silicone sur tout le perimetre du tampon.
Massa e misure imballi - Packing mass and dimensions - Masse et dimensions emballages - Verpackungsmasse und-abmessungen ZANOTTI S.p.a.
Sur la partie superieure injecter avant de fixer l’Uniblock.
Massa e misure imballi - Packing mass and dimensions - Masse et dimensions emballages - Verpackungsmasse und-abmessungen Massa e misure imballi - Packing mass and dimensions - Masse et dimensions emballages - Verpackungsmasse und-abmessungen
Masa y medidas del embalaje - Verpakkingsmassa en -afmetingen - Μάζα συσκευασίας και διαστάσεις • Spritzen Silikon auf den ganzen Stopfenperimeter ein.
Auf der Oberseite, führen das aus bevor man den Uniblock einbaut.
Masa y medidas del embalaje - Verpakkingsmassa en -afmetingen - Μάζα συσκευασίας και διαστάσειςMasa y medidas del embalaje - Verpakkingsmassa en -afmetingen - Μάζα συσκευασίας και διαστάσεις
330DB11XX
MAS335N02E Low temperature refrigeration Schema di montaggio - Mounting scheme - Schema de montage 0870Y1AA • • Inyectar silicona sobre todo el perimetro del agujero. 2650Y3AB 220DB11XX MASSA-MASS-MASA-MASSE-MASSE - MASSA - μάζα
1710Y2AA
BSB
MASSA-MASS-MASA-MASSE-MASSE - MASSA - μάζα 117DA11XX
010DA11XX
Sobre la parte superiore, se coloca antes de situar el Uniblock.
Schema di montaggio - Mounting scheme - Schema de montage
Schema di montaggio - Mounting scheme - Schema de montage
Injecteer siliconedichting rond de hele omtrekt van de opening in het paneel. Doe
dat ook aan de bovenkant voordat u het Uniblock monteert.
13 Kg
kW
1.710 (1)
-
2.650 (1)
-
• -
R-290
Refrigerating Low Montageschema - Esquema de montaje - Montageschema - Σχέδιο εγκατάστασης Montageschema - Esquema de montaje - Montageschema - Σχέδιο εγκατάστασηςMontageschema - Esquema de montaje - Montageschema - Σχέδιο εγκατάστασης
Nom
Scarico acqua di condensa Ø 10 0.871 (1)
Εγχύστε στεγανοποίηση σιλικόνης γύρω από όλη την περίμετρο του ανοίγματος
14 Kg
•
MASSA-MASS-MASA-MASSE-MASSE - MASSA - μάζα
στο πάνελ. Στην επάνω πλευρά κάντε το αυτό προτού τοποθετήσετε το Uniblock.
VOLUME-VOLUME-VOLUME-VOLUMEN-VOLUMEN-VOLUME-όγκος
Scarico acqua di condensa Ø 10
•
29 Kg
• -
capacity temperature R-452A Nom kW 0.628 (1) 0,31 m 3 1.029 (1) 2.472 (1) VOLUME-VOLUME-VOLUME-VOLUMEN-VOLUMEN-VOLUME-όγκος VOLUME-VOLUME-VOLUME-VOLUMEN-VOLUMEN-VOLUME-όγκος • • • Scarico acqua di condensa Ø 10
Condensate drain line Ø 10
-
Ecoulement eau de condensation Ø 10 -
•
1.699 (1)
•
Condensate drain line Ø 10
Condensate drain line Ø 10
Raccomandazioni in sede di installazione e per il controllo fornite sul manuale di installazione
• •
Ecoulement eau de condensation Ø 10
Ecoulement eau de condensation Ø 10
0,38 m 3
•
Kondensatablaßrohr Ø 10
•
• •
To be advised at time of order for factory installation and operating instructions
Kondensatablaßrohr Ø 10
• 300 x 520 540 x 820 x 809 924 x 1075 x 360
Dimensions Unit Height x Width x Depth mm 525 x 430 x 771 340 x 620 x 719 506 x 620 x 719 645 x 820 x 929 1,07 m 3 ZANOTTI S.p.a. MARINE TYPES • • Kondensatablaßrohr Ø 10
Desagüe ague de condensoción Ø 10
Recommandations au moments d’installations et pour le contròle fournis sur le manuel d’installation 1044 x 1
Desagüe ague de condensoción Ø 10
Desagüe ague de condensoción Ø 10
•
• •
Condensaftapleiding Ø 10
• • Γραμμή αποστράγγισης Ø 10 • Condensaftapleiding Ø 10 • • Condensaftapleiding Ø 10
Γραμμή αποστράγγισης Ø 10
Γραμμή αποστράγγισης Ø 10
Empfehlungen für die Installationsphase und zur Kontrolle, die im Handbuch zur Installation enthalten sind
Packed unit Height x Width x Depth mm 690 x 540 x830 660 x 730 x 790 690 x 930 x 880
Por cuanto respecta a recomendaciones de instalaciòn y control ver manual de instalaciòn 800x930x1000
•
ZANOTTI S.p.a.
87
68
Weight Unit kg • • 48 Te melden bij het bestellen voor installatie- en bedieningsinstructies van fabrikant 102 200 ZANOTTI S.p.a. 102
Θα υπάρξει ενημέρωση κατά την παραγγελία για εγκατάσταση εργοστασίου και οδηγίες λειτουργίας
82
61
124
Packed unit kg Massa e misure imballi - Packing mass and dimensions - Masse et dimensions emballages - Verpackungsmasse und-abmessungen 114 108 -
Hermetic Reciprocating
Compressor Type Masa y medidas del embalaje - Verpakkingsmassa en -afmetingen - Μάζα συσκευασίας και διαστάσεις
Nominal power kW 0.6 - / Loch / Agujero / MASSA-MASS-MASA-MASSE-MASSE - MASSA - μάζα 2.2 - 1.5 Foro / Hole / Trou - • • Iniettare silicone su tutto il perimetro del tampone.
1.3
Iniettare silicone su tutto il perimetro del tampone.
•
Foro / Hole / Trou
Sul lato superiore eseguire l’operazione prima del posizionamento.
Sul lato superiore eseguire l’operazione prima del posizionamento.
/ Loch / Agujero /
Inject silicone seal round the whole perimeter of the opening in the panel.
•
Inject silicone seal round the whole perimeter of the opening in the panel.
Direct
CHILLERS
Starting method Foro / Hole / Trou • Iniettare silicone su tutto il perimetro del tampone. Boorgat 29 Kg On the upper side, do that before siting the Uniblock. Boorgat On the upper side, do that before siting the Uniblock.
Οπή
Οπή
Sul lato superiore eseguire l’operazione prima del posizionamento.
/ Loch / Agujero /
Boorgat • Inject silicone seal round the whole perimeter of the opening in the panel. • Injecter silicone sur tout le perimetre du tampon. • Injecter silicone sur tout le perimetre du tampon.
Οπή
Sur la partie superieure injecter avant de fixer l’Uniblock.
°C
MAS340T02E Operation range Cold room temperature Min. ~Max. • On the upper side, do that before siting the Uniblock. VOLUME-VOLUME-VOLUME-VOLUMEN-VOLUMEN-VOLUME-όγκος • Sur la partie superieure injecter avant de fixer l’Uniblock.
-25 ~-15
•
Spritzen Silikon auf den ganzen Stopfenperimeter ein.
Spritzen Silikon auf den ganzen Stopfenperimeter ein.
Injecter silicone sur tout le perimetre du tampon.
1,07 m 3
Auf der Oberseite, führen das aus bevor man den Uniblock einbaut.
Auf der Oberseite, führen das aus bevor man den Uniblock einbaut.
Sur la partie superieure injecter avant de fixer l’Uniblock.
•
Refrigerant Type • • Spritzen Silikon auf den ganzen Stopfenperimeter ein. R290 R-452A Inyectar silicona sobre todo el perimetro del agujero. R290 • • Inyectar silicona sobre todo el perimetro del agujero.
Injecteer siliconedichting rond de hele omtrekt van de opening in het paneel. Doe dat ook R-452A
R290
R-452A
Sobre la parte superiore, se coloca antes de situar el Uniblock.
Sobre la parte superiore, se coloca antes de situar el Uniblock.
Auf der Oberseite, führen das aus bevor man den Uniblock einbaut.
Injecteer siliconedichting rond de hele omtrekt van de opening in het paneel. Doe dat ook
•
Inyectar silicona sobre todo el perimetro del agujero.
GWP • voordat u het Uniblock monteert. 2,141.0 3.0 2,141.0 Εγχύστε στεγανοποίηση σιλικόνης γύρω από όλη την περίμετρο του ανοίγματος στο πάνελ. 2,141.0 3.0 • aan de bovenkant voordat u het Uniblock monteert.
aan de bovenkant voordat u het Uniblock monteert.
Sobre la parte superiore, se coloca antes de situar el Uniblock.
3.0
• ZANOTTI S.p.a.
Injecteer siliconedichting rond de hele omtrekt van de opening in het paneel. Doe dat ook aan de bovenkant
Εγχύστε στεγανοποίηση σιλικόνης γύρω από όλη την περίμετρο του ανοίγματος στο πάνελ.
Στην επάνω πλευρά κάντε το αυτό προτού τοποθετήσετε το Uniblock.
Στην επάνω πλευρά κάντε το αυτό προτού τοποθετήσετε το Uniblock.
500
Evaporator Air flow • Εγχύστε στεγανοποίηση σιλικόνης γύρω από όλη την περίμετρο του ανοίγματος στο πάνελ. Στην επάνω 550 2,300 2,560 1,100 1,320
m³/h
780
πλευρά κάντε το αυτό προτού τοποθετήσετε το Uniblock.
Air throw • • Raccomandazioni in sede di installazione e per il controllo fornite sul manuale di installazione 4 (3) • • Raccomandazioni in sede di installazione e per il controllo fornite sul manuale di installazione • • 4 (3) Raccomandazioni in sede di installazione e per il controllo fornite sul manuale di installazione
m
10 (3)
3 (3)
To be advised at time of order for factory installation and operating instructions
To be advised at time of order for factory installation and operating instructions
To be advised at time of order for factory installation and operating instructions
Empfehlungen für die Installationsphase und zur Kontrolle, die im Handbuch zur Installation enthalten sind • 750
400
2,010
1,500
m³/h
Condenser Air flow • • Recommandations au moments d’installations et pour le contròle fournis sur le manuel d’installation • Recommandations au moments d’installations et pour le contròle fournis sur le manuel d’installation • • Recommandations au moments d’installations et pour le contròle fournis sur le manuel d’installation
1,200
640
1,400
Empfehlungen für die Installationsphase und zur Kontrolle, die im Handbuch zur Installation enthalten sind
Empfehlungen für die Installationsphase und zur Kontrolle, die im Handbuch zur Installation enthalten sind
FAN COIL UNITS
Hot gas
Defrost • • Por cuanto respecta a recomendaciones de instalaciòn y control ver manual de instalaciòn • • • Por cuanto respecta a recomendaciones de instalaciòn y control ver manual de instalaciòn • • • Por cuanto respecta a recomendaciones de instalaciòn y control ver manual de instalaciòn
Te melden bij het bestellen voor installatie- en bedieningsinstructies van fabrikant
Te melden bij het bestellen voor installatie- en bedieningsinstructies van fabrikant
Te melden bij het bestellen voor installatie- en bedieningsinstructies van fabrikant
Θα υπάρξει ενημέρωση κατά την παραγγελία για εγκατάσταση εργοστασίου και οδηγίες λειτουργίας
Θα υπάρξει ενημέρωση κατά την παραγγελία για εγκατάσταση εργοστασίου και οδηγίες λειτουργίας
Power supply Voltage / Phase /Frequency • Θα υπάρξει ενημέρωση κατά την παραγγελία για εγκατάσταση εργοστασίου και οδηγίες λειτουργίας 400 / 3N~ / 50 230 / 1~ / 50
230 / 1~ / 50
V/Hz
Massa e misure imballi - Packing mass and dimensions - Masse et dimensions emballages - Verpackungsmasse und-abmessungen Massa e misure imballi - Packing mass and dimensions - Masse et dimensions emballages - Verpackungsmasse und-abmessungen
Massa e misure imballi - Packing mass and dimensions - Masse et dimensions emballages - Verpackungsmasse und-abmessungen Masa y medidas del embalaje - Verpakkingsmassa en -afmetingen - Μάζα συσκευασίας και διαστάσεις
Masa y medidas del embalaje - Verpakkingsmassa en -afmetingen - Μάζα συσκευασίας και διαστάσεις
Medium temperature Masa y medidas del embalaje - Verpakkingsmassa en -afmetingen - Μάζα συσκευασίας και διαστάσεις 1310Y 315EB 2180Y 320EB 3370Y 425EB 210EA 5820Y 212EB 530EB MASSA-MASS-MASA-MASSE-MASSE - MASSA - μάζα
005EA 106EA 107EA
MSB
MASSA-MASS-MASA-MASSE-MASSE - MASSA - μάζα
refrigeration 11XX 11XX 11XX 1AA 11XX 1AA 11XX 2AA 14 Kg 11XX 3AC 11XX 11XX 14 Kg
MASSA-MASS-MASA-MASSE-MASSE - MASSA - μάζα
11XX
13 Kg
VOLUME-VOLUME-VOLUME-VOLUMEN-VOLUMEN-VOLUME-όγκος
Refrigerating Medium R-134a Nom kW 0.857 (2) 1.120 (2) - 3.282 (2) - 3.550 (2) - 3.774 (2) 1.799 (2) - 2.022 (2) 4.871 (2) VOLUME-VOLUME-VOLUME-VOLUMEN-VOLUMEN-VOLUME-όγκος
0,31 m 3 1.338 (2)
VOLUME-VOLUME-VOLUME-VOLUMEN-VOLUMEN-VOLUME-όγκος
0,38 m 3
0,38 m 3
capacity temperature R-290 Nom kW - 1.31 (2) - 2.18 (2) - 3.37 (2) - 5.82 (2) -
Dimensions Unit Height x Width x Depth mm 525 x 430 x 771 506 x 620 x 719 340 x 620 x 719 645 x 820 x 929 360 x 820 x 809 645 x 820 x 929 1,044x1,300x410 760 x 920 x 1,042 540 x 820 x 809 1,044 x 1,300 x 520 540 x 820 x 809 785 x 1,075 x 1,046
Packed unit Height x Width x Depth mm 690 x 540 x 830 ZANOTTI S.p.a. 800 x 930 x 1,000 880 x 1,100 x1,100 ZANOTTI S.p.a. - 690 x 930 x 880 920 x 1,200 x 1,120 ZANOTTI S.p.a.
690 x 930 x 880
660 x 730 x 790
Weight Unit kg 42 59 92 75 92 102 110 74 200 75 151 AIR HANDLING UNITS
Packed unit kg 55 73 114 139 95 96 184
Compressor Type Hermetic Reciprocating
Nominal power kW 0.5 0.6 0.7 - 2.2 - 2.6 - 2.9 0.9 - 1.7 3.7
Starting method Direct
Operation range Cold room temperature Min. ~Max. °C -5 ~10
Refrigerant Type R-134a R290 R-134a R290 R-134a R290 R-134a R290 R-134a
GWP 1,430.0 3.0 1,430.0 3.0 1,430.0 3.0 1,430.0 3.0 1,430.0
Evaporator Air flow m³/h 500 550 610 2,300 1,220 2,300 1,500 2,300 1,100 3,600 1,100 3,450 REFRIGERATION
Air throw m 3 (3) 4 (3) 10 (3) 4 (3) 10 (3)
Condenser Air flow m³/h 400 750 640 1,500 1,200 1,500 1,755 3,100 1,400 2,900 1,400 3,200
Defrost Hot gas
Power supply Voltage / Phase /Frequency V/Hz 230 / 1~ / 50 400 / 3N~ / 50 230 / 1~ / 50 400 / 3N~ / 50
(1) When normally running: -20°C / +30°C
(2) When normally running: 0°C / +30°C
(3) Use air throw as a base. Air throw is affected by many factors such as height of room, product storage, location of evaporator, etc. CONTROL SYSTEMS
665